Sunday, March 29, 2009

Magic Eraser Makes ActivInspire Magical

A lot of hits on this blog come from people looking for ways to use the magic eraser in ActivInspire. The Magic eraser is called Magic Ink in ActivInspire and is the eraser in ActivStudio. Regardless of the name, it is one of my favorite tools for wowing and engaging students. The magic pen reveals images or text hidden underneath other graphics. I have used magic erasers to reveal names of states on a map, definitions of words for vocabulary review, labels on a diagram, and more.


Prometheanplanet makes using magic eraser a breeze. Download the magic eraser resource. The resource offers ready-made images that have the magic eraser build into them. The resource pack offers many images such as a magnifying glass, glasses, binoculars, and many more fun graphics.


Layering is the key to using the magic eraser. The image with magic eraser needs to be on the top. The image that covers what you want to reveal goes on the top layer just below the magic eraser. Revealing an item requires placement of that image on the middle layer. I would also recommend that you lock the magic eraser if you plan on moving items into the magic eraser like the example below.


Creating magic eraser tools from scratch is a snap with Activinspire. The Object Browser makes it easy to see the layers that objects are located. You can quickly move objects from one layer to the next. No more guess work like in Activstudio.


The best way to improve your skills with magic eraser is to dissect flipcharts containing magic erasers. There are many on Prometheanplanet. Have fun with the magic erasers.

Friday, March 20, 2009

Activboard Comes Alive With Interactive Math Activities

My gifted 3rd grade students started a geometry unit this week. In an effort to prepare my lessons and make flip charts for the students, I took some time reviewing interactive math websites. I thought I would share the sites that work well with the interactive white boards.

Venn Diagram
Shape Sorter:
Activity includes a mystery sort. Students must use critical thinking to figure out the rules of the sort.


Shape Tool:
Demonstrates the translations, reflections and rotations of shapes.


What's My Angle?
Help teachers teach angle measurement and how to use a protractor.


Hidden Picture:
Review geometry vocabulary and reveal a hidden picture.


Additional sites with great interactive activities in all areas of mathematics:

Illuminations
National Library of Virtual Manipulatives
Shodor Interactivate: Activities

Thursday, March 12, 2009

Moodle Moves My Teaching into Cyberspace

I started using Moodle in my classroom last year. Moodle is an open source course management system. My school district uploaded it on to our servers and has made it easy to access. Any teacher can get a virtual Moodle classroom, even if they do not have a server, just by going to sqooltools.net.

Moodle allows me to create an online course that compliments my teaching. Moodle allows me to communicate with parents, post daily homework, and offer extra activities for home practice. In the classroom, Moodle is used to give quizzes, check student understanding of content, supply safe links to online resources, and even display student work. Moodle looks and feels like a website, but has privacy protection for students. Only those enrolled in the Moodle course have access to the content.

My students love many of Moodle’s features. Their favorite module is the chat. Students chat in small groups to collaborate on projects. Collaborating in Moodle’s chat allows for great conversations, while not adding to the classroom noise level. The chats are also great for deepening a students understanding of a topic. Book chats allow those quite and shy students to have a voice. One of my students will not talk in front of others during a class discussion, but chats up a storm. She posts many high quality questions to keep us thinking. I have even heard of a teacher who has used chat in the evening to help student prepare for a test. She would post questions to the different students in the chat. Students took turns answering her questions. All the students who participated in the chat did very well on the test the next day.

Another useful feature on Moodle is the quiz module. Quizzes are great for assessing vocabulary as well as students’ comprehension of a novel. The possibilities are endless and the students seem to enjoy the paperless tests. I like the quizzes because for the most part they are self scoring. You create the question and the answer and once the student answers the question Moodle then records the score. The only questions you have grade are the essay questions. I do review all quizzes to see what I need to reteach, but the self-scoring is a real timesaver. By setting the quiz module to a setting that allows students retake quizzes, student can repeat quizzes until they understand the material.

The last feature I want to share is key for the students that I work with throughout the week. I teach gifted education students. Often they complete their regular classroom work quickly. They need alterative activities to keep them engaged and out of trouble. Adding activities to Moodle for these students can provide alternative learning greatly needed by these students. These enrichment activities can be password protected just for a particular student. My students can safely explore and area of interest even when they are not in the gifted classroom. The regular education teachers appreciate the ease in which Moodle helps them to challenge the gifted students.

Monday, March 2, 2009

Improving Student Writing with Technology

All teachers work hard each day trying to help students improve their written communication skills. When I was young we had a typewriter that had a spell check. You still had to worry about the grammar and punctuation errors on your own. Today, with the use of web 2.0 tools and word processors, we can empower our students with the ability to assess their writing independently.

Even the most able students do not read through their work carefully when trying to make revisions. Children tend to fill in missing any words in their mind causing them to miss even the simplest of errors. Hearing what you have written is an invaluable tool to improving writing. Voice recognition software helps students hear the mistakes they have made in their writing. Two of the most useful tools I have found are Vozme.com and Microsoft Reader.

Vozme.com allows the student to copy and paste their writing into the Vozme reader. The reader then reads the words. Students can quickly hear their words and correct mistakes. The program allows the student to start and stop the reader as much as necessary. This has been a very powerful tool for catching typos and missing words in a student’s writing. I no longer have to ask the question, “Do that sound right to you?” Vozme.com helps students ask the question for themselves.

Microsoft Reader is a free down load that allows you to read e-books on your PC. You can also take documents and import them into the reader. Students can hear what they have writing. Students hear their errors and are able to correct them. I use Microsoft Reader as a publishing tool as well. Students really enjoy turning their stories into e-books. Students add illustrations and photographs to their book. The book looks just like the ones we have downloaded from Project Gutenberg. Students are excited to share the published pieces.

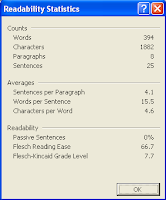
Microsoft Word is the most powerful tool I have to help students improve their writing. Not only does it give students confidence to get their words out without worrying about spelling, but students can check their grammar, readability, and level of the writing. As students revise their writing they watch the readability and level of writing go up. The growth keeps students engaged and motivated during the revision process.

Our district is still using Microsoft Office 2000. I apologize that my images come from an old version of Word, but the tools are available in newer versions as well.


To get the readability to display just go to tools>options>spelling and grammar tab. Then make sure the show readability statistics is checked. Recheck your writing. The students who use this tool free empowered. They can see their writing improve in quality. I often use this tool with fifth grade students who are using limited vocabulary and are writing at a 3rd grade level. Students are often are surprised by the low level of their writing. It is nice to give them tools to help them make improvements independently.